Hello and welcome to this short guide on How To Import Your Design Using share Codes On LeadsLeap
This guide is for you if you don’t know how to activate your leadsleap shared code of a funnel, an opt-in form share code, or email swipe share code shared to you by someone else or your LeadsLeap sponsor.
It is also for you if you want to learn how to create a simple opt-in form using Aweber email marketing tool.
by the end you finish reading this short guide you will not only know how to activate your share code, create an option form on Aweber but also how to connect your email list with Leadsleap.
You can jump to the section that interest you.
But first and foremost…
What is LeadsLeap about and what can you do using this platform?
For your information, Leadsleap is a marketing tool that offers basic tools suite you can use to promote your online business.
Here are things you can do with Leadsleap:
Want to learn more, check out my review here and my SendsTeed review to learn more.
Since this post is about activating your leadsleap share code in your own account, let me show you the type of shared code available on LeadsLeap you can share. Or you can be getting.
Here are the different shared codes available in LeadsLeap:
- You can share your pages such as landing pages, squeeze pages, and sales pages with other people. In a nutshell, all your designs (including pop-ups, and opt-in forms) can be shared with other people to duplicate the same design.
- You can share a simple opt-in form or a pop-up with your leads or followers.
- You can also share your email series with others with a simple shortcode.
So if someone shares a code with you, just ask that person which kind of design code he is sharing with you. Is it a landing page or a squeeze page code ? Is it an email series? Or is it a pop-up or opt-in form code?
This way is you can know where to go for its activation.
Now that you know the different shared codes available on LeadsLeap, let’s get to the point.
How To Import Your Design Using share Codes On LeadsLeap?
As I said, there are different share codes.
For this tutorial, I will be using an opt-in form code as an illustration.
To activate your share code, you first need to log into your LeadsLeap account.
Once inside your LeadsLeap account, you just have to hover your mouse in the appropriate section (in our case we go to the “form and popup manager” section.
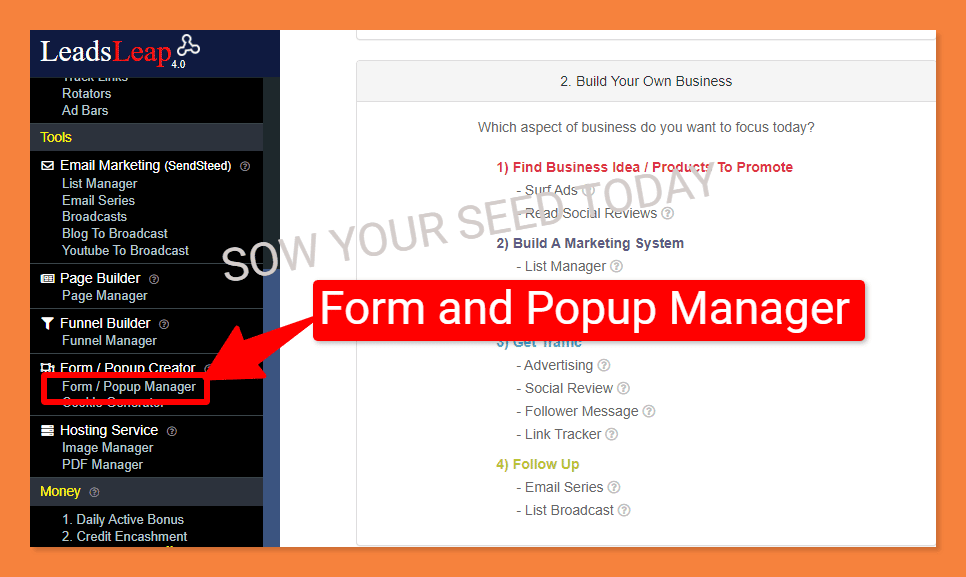
So I click on this section.
PS: If the code you have is a landing page code, you just have to click on the page manager section. If it is an email series, you click on the “email series” section.
When I click on the “form and popup manager” section, a popup like the one below will show up.
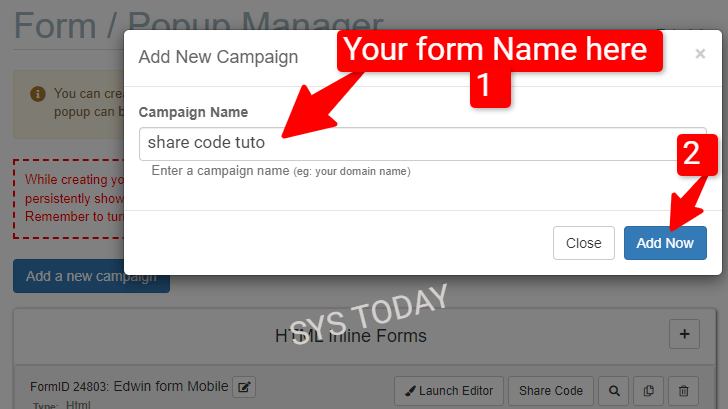
From here, you just have to give a name to your form or campaign. I name mine “share code tuto” (just an example).
Don’t worry you can change it later.
Once you have done, click on add now button.
And that will take you to this page below.
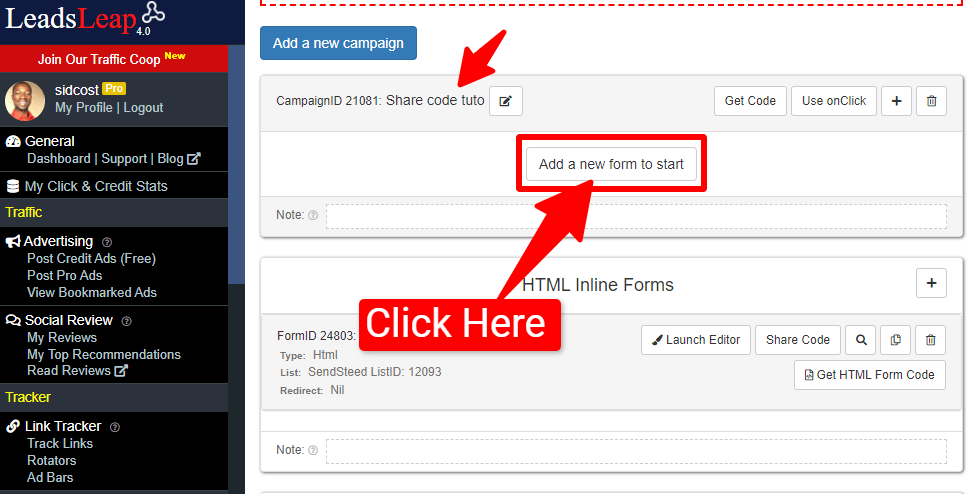
From here, what you have to do is to click on the “add a new form to start” button as outlined.
So I click on this button. And that will take me to this page below where I can use the share code to import my design.
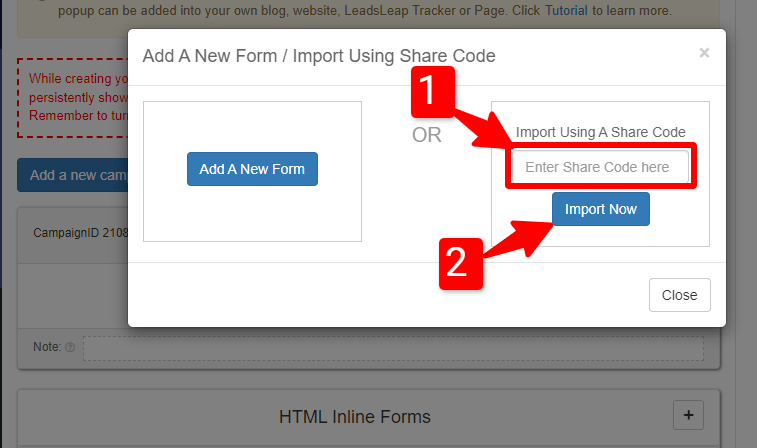
As you can see, you have a section where you can add the code shared with you.
Just enter the code there and then click on the “import now” button.
That will take you to a page like the one below.
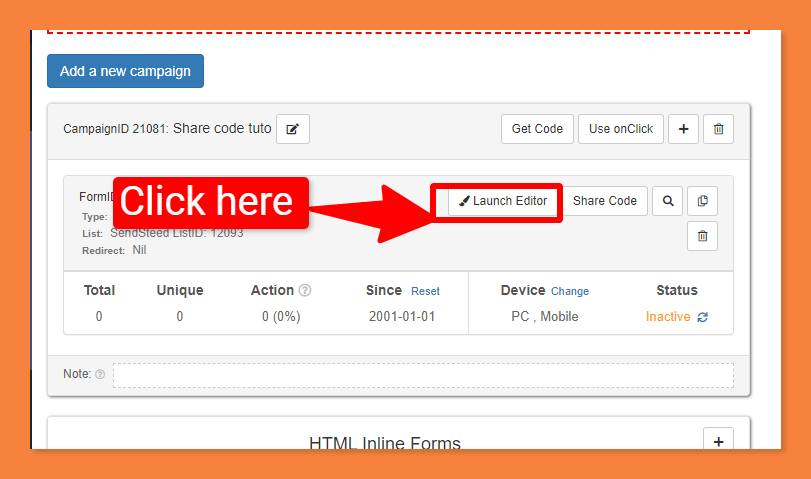
Here, what you have to do is to click on the launch editor button. That will take you to the page editor where you can see your design.
Here is how my imported form looks like.
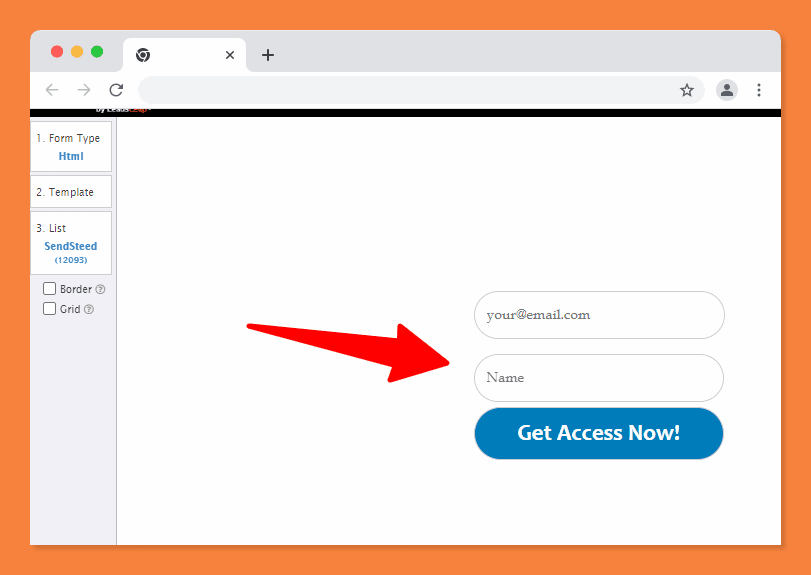
Congrats! You have imported your design. But an important task remains.
You have to connect your opt-in form or design with your email list. This way when people opt-in to your email list, they can be added to your list as subscribers.
Note that you can use the LeadsLeap email marketing tool. You also have the option to use an external email marketing tool such as Aweber, Getresponse, Moosend, or any email tool you wish with LeadsLeap.
For this tutorial, I will be using an external email marketing tool – Aweber.
How to connect your opt-in form or landing page with Aweber?
In order to connect your email list with your leadsLeap opt-in form, you have to create an opt-in form just like the one you imported using the code.
Don’t worry you don’t need to make it look like the one above. You need to have sections for email input and another one for name input and a CTA button with your CTA message or text.
That is it.
Creating your Aweber Opt-in form
To create an opt-in form with Aweber, you have to log in to your Aweber account. Then go to create a form and then create a form with the field mentioned above.
Once inside your Aweber dashboard, navigate to “pages and forms, then click on the “sign up forms” section.
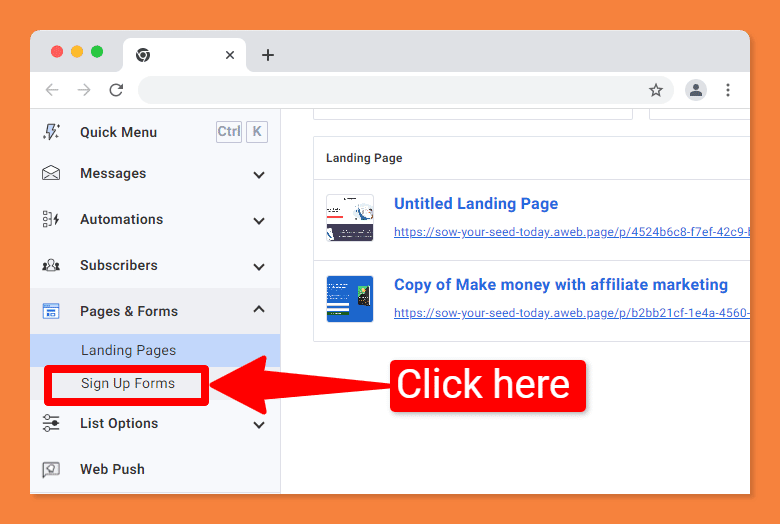
When you click on this section, that will take you to a page like the one below.
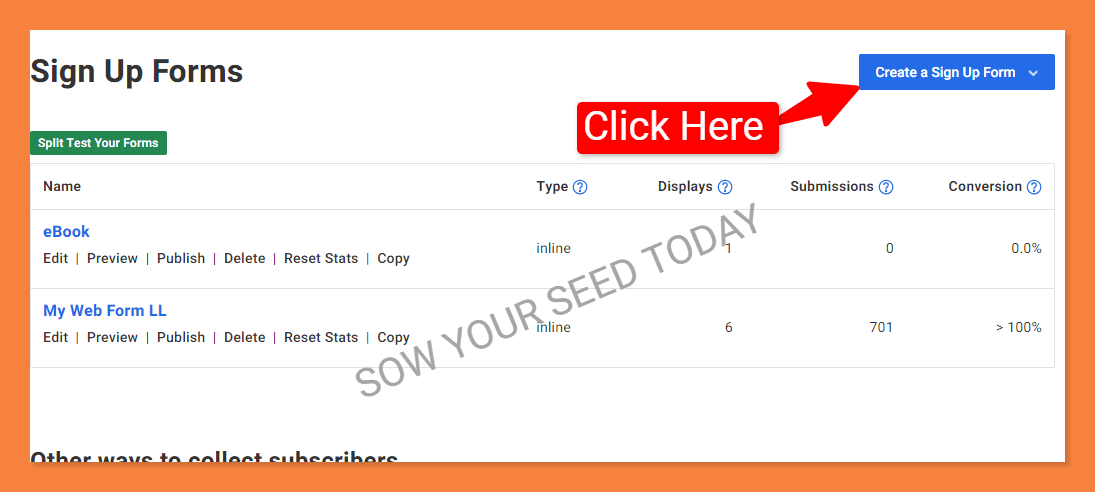
From here, you just have to click on the “create a signup form” button as outlined above. And then choose the “for my website” option.
That will take you to this page below where you can design your opt-in form as you wish.
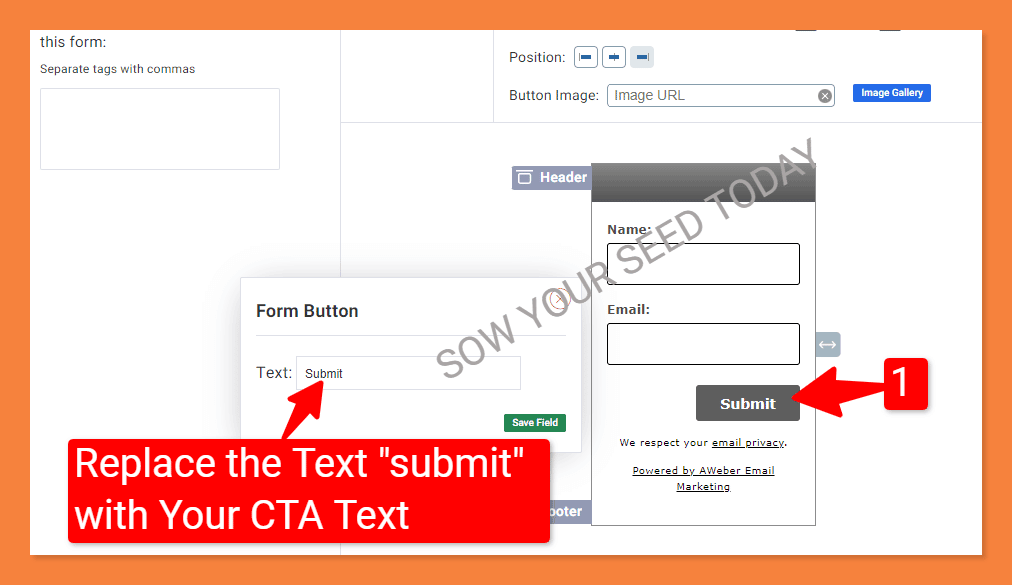
From here, what you just have to do is click on the submit button (1). That will show up in the form button section where you can replace the text (submit) with your CTA button text. Mine is “Get Access Now”.
Once you have replaced the text with your CTA button text, make sure you click on the green button where it says “save field” to save your it. Then click on the save button below to save your work.
Congrats! You just created your opt-in form. That is great! But we need the opt-in HTML code to connect with your LeadsLeap opt-in form.
Getting Your Aweber HTML opt-in form code
Once you have finished designing your Aweber opt-in form, you just have to navigate to the publish section. Aweber will show you 2 options to publish your opt-in form.
Choose the first option ( I will install my form).
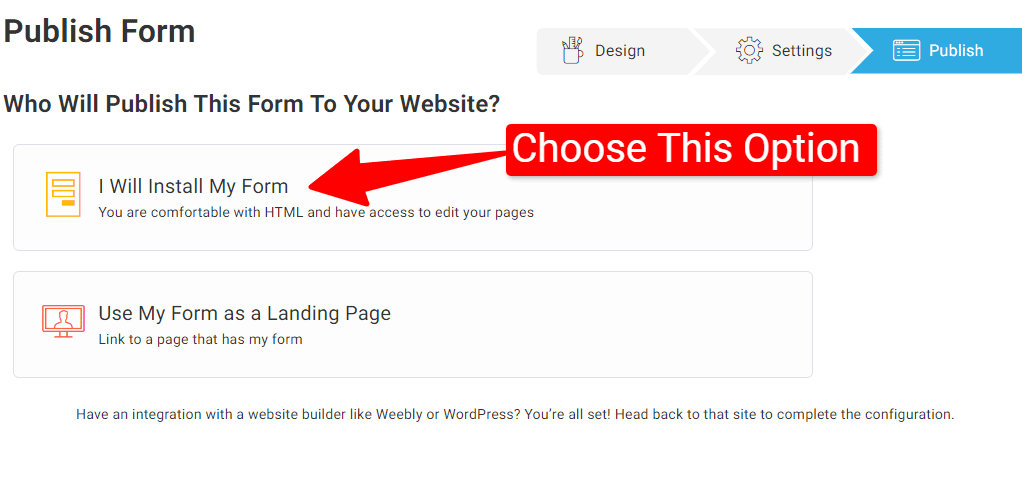
That will open this section below.
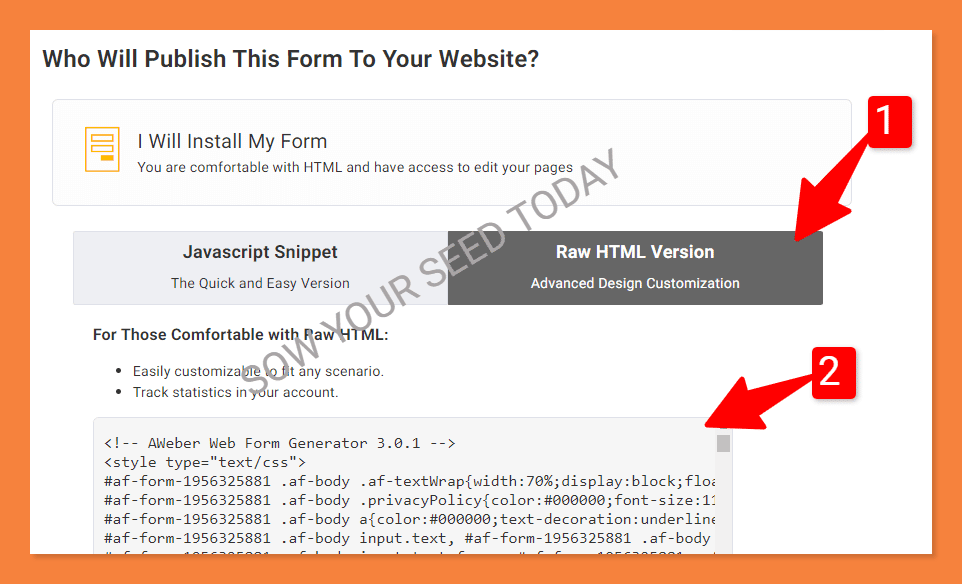
Here you just have to select the “raw HTML version”. So click on this section and then copy the HTML code there.
Now you have your Aweber HTML opt-in code you can use to connect with your opt-in form imported and designed with LeadsLeap.
Connecting your HTML opt-in form code to the imported form
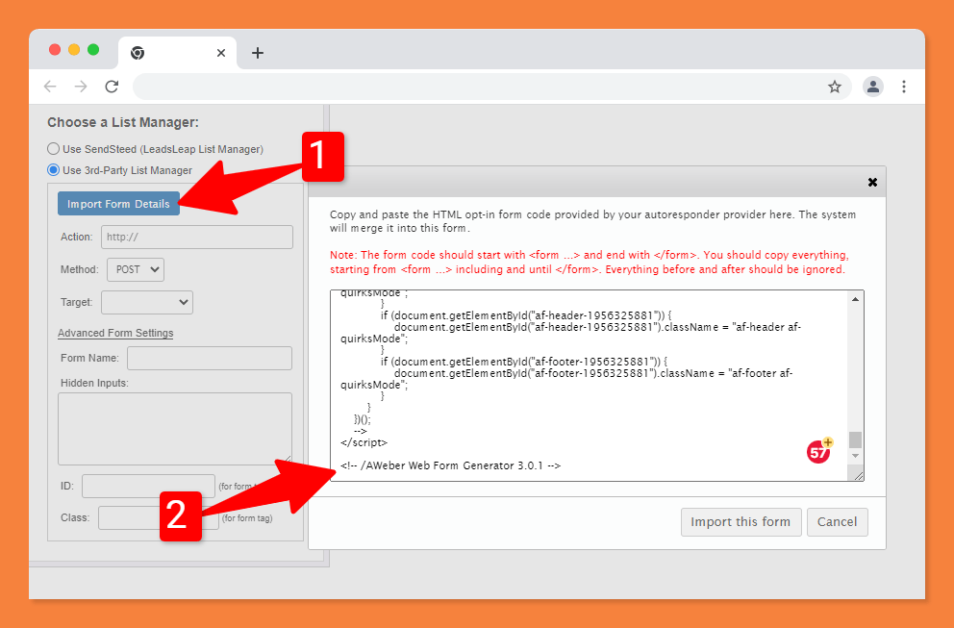
To add your Aweber HTML code to your LeadsLeap opt-in form, click on “list” (1). Then select the “use 3rd party list manager” option.
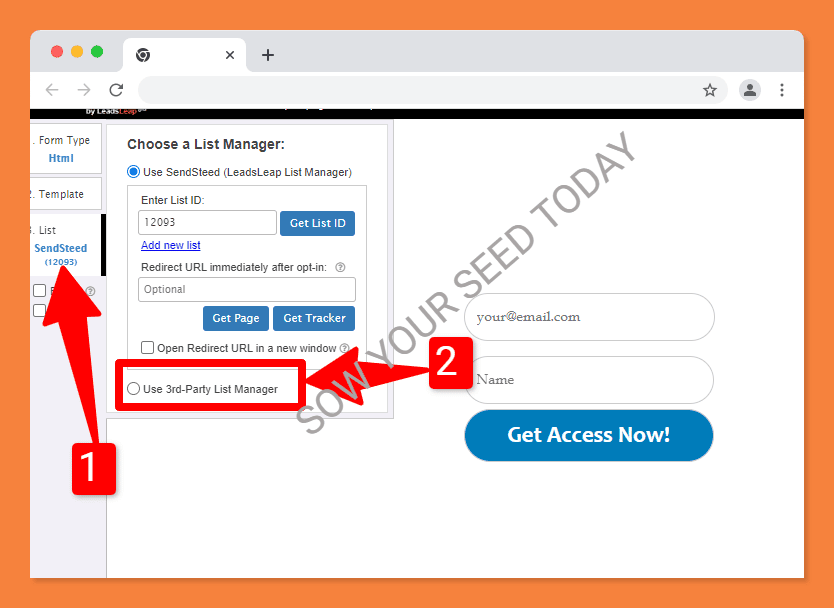
When you do, click on the blue button where it says “import form details”. A window like the one below will pop up – giving you an area to put your Aweber opt-in form HTML code. Just paste your code there.
And don’t forget to click on the button below the box where it says “import this form”.
If your CTA is the same as the one designed with the LeadsLeap form builder (your imported opt-in form), you will get the same design as the one below.
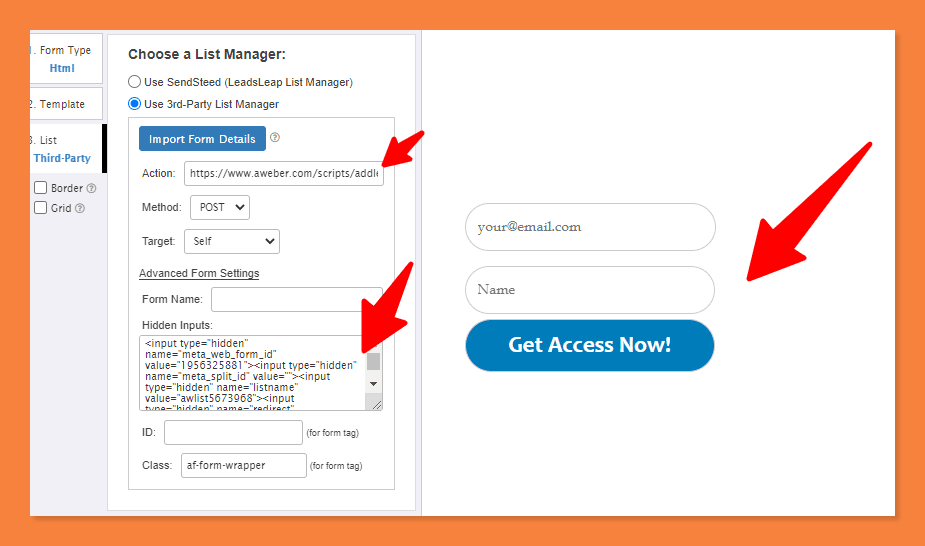
Congrats! You just connected your Aweber email list with your opt-in form.
Don’t forget to click on the save button on top of the LeadsLeap editor to save your work.
PS: Your email list should be connected to your Aweber form in order for your subscribers to be added to your email list.
How to add your opt-in form to your website?
To get your opt-in form to your website, you just have to go to your LeadsLeap dashboard. Then go to the “forms and popup manager” section.
Once there if you have more than one opt-in form, you will need to locate the one you want to add to your website.
When you find the form you want to use, just click on the “get HTML form code” button.
That will pop up a window like the one below with the HTML code. Just copy it!
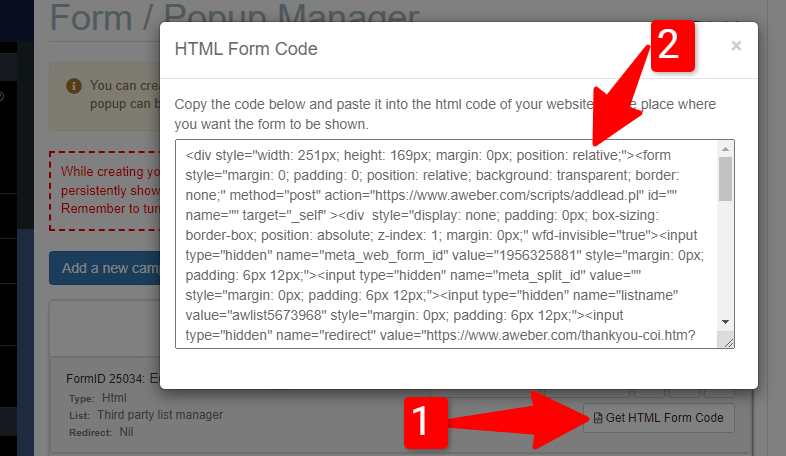
PS: You can insert your opt-in form on the sidebar, footer section, or inside your blog post.
No matter the area of your site, you will add it, the process is the same.
You just have to drag and drop the HTML widget (if you are using the Gutenberg editor) to where you want to display the opt-in form. Refer to the image below.
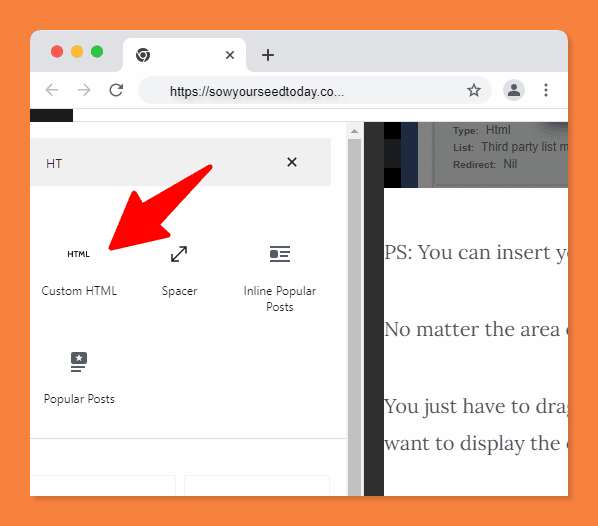
And then past the HTML code copied on LeadsLeap there. And that is all!
Final thoughts…
LeadLeap is a great opt-in builder you can use to build stunning opt-in forms to grow your email list faster.
And no matter the email marketing tool you use, it can be integrated with your LeadsLeap forms, landing pages, popups, etc.
I hope by following this step-by-step guide you will be able to connect your email list with your LeadsLeap opt-in form and start building your email list.
Must-read post: Ultimate email Marketing guide for beginners.
How to create an affiliate marketing funnel from scratch.
How to build an affiliate marketing landing pages.
If you have a question, let me know in the comment section below and I will answer you ASAP!
Be an ACTION taker, SOW YOUR SEED TODAY!
To your success!


